Creating Azure Resources in Azure Pipelines
Posted: October 11, 2020 Filed under: Azure, DevOps | Tags: .NET Core, Azure, Azure Pipelines, Continuous Deployment (CD), Continuous Integration (CI), DevOps 1 CommentIf you intend to build infrastructure in Azure as part of your build or release pipelines, for example using Azure Resource Management (ARM) templates, you should use a service principal to connect to your Azure subscription. In this post, I’ll show you how to use the Azure CLI to create a service principal with sufficient permissions for both creating resources and assigning roles to them, and how to setup a service connection to use it in Azure DevOps.
Application object
To be able to create a service principal, your Azure account must have sufficient permissions. If you work on behalf of an organization where you’re not an administrator, you will have to ask your Azure Active Directory (AD) admin to either create a service principal for you, assign you a role that can create and manage application registrations, or enable non-admin users to register applications.
In this context, an application or “app” refers to a globally unique application object in Azure. It’s used (and required) to integrate with the Azure AD that handles the access management for all resources. An app may be configured to be accessible from within your organization, or tenant, only (single-tenant), or from other organizations as well (multi-tenant).
Service principal
To be able to access a resource that is secured using Azure AD, such as for example an app, you must use a security principal of some kind. The principal defines the permissions for the application, or user depending on whether it’s a service principal or user principal, in a specific Azure AD tenant. Service principals are recommended to use over user identities in scripts and other automated tools, such as for example continuous integration (CI) and continuous delivery (CD) pipelines.
Before looking at how to create a service principal, it should also be mentioned that there are two types of authentication available for service principals in Azure: password-based authentication and certificate-based authentication. This post focuses solely on password-based authentication.
Azure CLI
Assuming you have installed the Azure CLI and have permissions to create service principals, you can use the below command to create one from the command-line after you have signed in interactively using the az login command. As an alternative to installing and using the Azure CLI on your computer, you can use the Cloud Shell to run the command(s) in a web browser.
az ad sp create-for-rbac --name http://sp-DemoApp --role Owner
The above command will basically do the following:
- Create an application object that you can find and inspect by running the
az ad app list --display-name sp-DemoAppcommand in the CLI, or by browsing to Azure Active Directory->App registrations->All applications in the Azure portal. - Assign the built-in
Ownerrole to the application as specified by the--roleoption. The default role isContributor. Whether the service principal should be in theOwnerrole depends on whether it will be used to grant access to any Azure resources.In my GitHub example on how to set up CI/CD for containerized .NET apps, the CI pipeline creates an Azure Container Registry (ACR) using an ARM template. The template accepts the object id of a service principal as a parameter and assigns it the
AcrPullrole to the ACR. In this case, theOwnerrole is required for the service principal that the pipeline itself uses to connect and authenticate to Azure with using the service connection to be able to assign theAcrPullrole to the service principal that will be used to fetch the container image from the ACR. - Create a service principal that can be retrieved using the
az ad sp list --display-name sp-DemoAppcommand in the CLI, or found under Azure Active Directory->Enterprise applications->All applications in the portal.
Note: In the portal, there is no way to directly create a service principal. When you register an application under Azure Active Directory->App registrations, a service principal is automatically created together with the application object. The docs explains how to assign a role to the application in the web UI.
Scope
By default, the service principal’s role assignment applies to the current Azure subscription. If you have several subscriptions, you can switch the current, or active, one using the az account set command as explained in the docs.
If you create a resource group upfront before you run your pipelines, you can use the --scopes parameter to restrict the service principal to only be able to create resources and assign roles within this particular resource group:
# Create a resource group to hold the resources for the Azure solution
resourceGroupName="rg-DemoApp"
az group create --name $resourceGroupName --location westeurope

# Get the object ID of the resource group
resourceGroupId=$(az group show --name $resourceGroupName --query id --output tsv)

# Create the Service Principal
az ad sp create-for-rbac --name http://sp-DemoApp --role Owner --scope $resourceGroupId
You don’t have to create any Azure resources at all (except for the service principal(s)) before running your pipelines though. The Azure Resource Group Deployment task in Azure Pipelines can be used to automatically create a resource group if it doesn’t exist when a pipeline is run, subject to the value of the action argument. The default value is Create Or Update Resource Group.
Service connection
The az ad sp create-for-rbac command generates an output that contains some values that you will need when you set up the service connection between Azure DevOps and Azure:

The password is the only value in the output that cannot retrieved using the az ad sp list command. If you lose it, you could generate a new one using the following command:
az ad sp credential reset --name http://sp-DemoApp
To be able to set up the service connection from Azure DevOps, you will also need to provide a subscription id and name. These values can be retrieved using the az account show command:
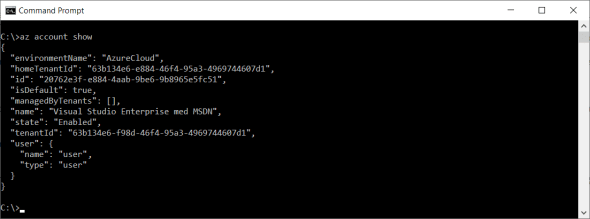
Once you have created an application object and a service principal and know the values of the appId, password, tenant, subscription id and subscription name, you can sign in to the Azure DevOps portal to create a service connection:
- Select Service principal (manual) as the authentication method
- Enter the id from the output of the
az account showcommand into the Subscription Id field - Enter the name from the output of the same command into the Subscription Name field
- Enter the appId from the output of the
az ad sp create-for-rbaccommand into the Service Principal Id field - Enter the password into the Service principal key field
- Enter the tenant into the Tenant ID field
- Enter a name for the connection into the Service connection name field
- Click on the Verify and save button to save the service connection

Automation
Instead of using the Azure DevOps web portal to manually set up a service connection, there is an extension available to the Azure CLI that you can use to automate the creation of the service connection. To be able to use it, you first need to explicitly install the extension using the following command:
az extension add --name azure-devops
If you intend to automate the creation of both the service principal and the service connection in a deployment script, you should store the output of the az ad sp create-for-rbac and az account show commands in variables for later use. Here is how you would do this in a Bash script:
servicePrincipalName='http://sp-DemoApp'
password=$(az ad sp create-for-rbac --name $servicePrincipalName --role Owner --query password \
  --output tsv)
appId=$(az ad sp show --id $servicePrincipalName --query appId --output tsv)
tenant=$(az ad sp show --id $servicePrincipalName --query appOwnerTenantId --output tsv)
subscriptionId=$(az account show --query id --output tsv)
subscriptionName=$(az account show --query name --output tsv)
Assuming you have the appropriate permissions, the following commands could then be used to add an Azure service connection to an Azure DevOps team project called “DemoApp” that resides within an organization called “contoso”:
az devops configure --defaults organization=https://dev.azure.com/contoso project=DemoApp

export AZURE_DEVOPS_EXT_AZURE_RM_SERVICE_PRINCIPAL_KEY=$password

az devops service-endpoint azurerm create \
  --azure-rm-service-principal-id $appId \
  --azure-rm-subscription-id $subscriptionId \
  --azure-rm-subscription-name "$subscriptionName" \
  --azure-rm-tenant-id $tenant \
  --name AzureServiceConnection
Full example
There are similar commands for updating and deleting endpoints and for managing team projects and other types of service connections as well. My GitHub repository contains an example of full Bash deployment script that creates an Azure DevOps team project and adds both Azure and GitHub service connections to it. It can be run repeatedly as it checks whether the project and the service connections exist before trying to create them.
In this script, you will also find an example of how to automate the creation of YAML pipelines using the az pipelines create command, and how to define pipeline variables using the az pipelines variable create command. The docs folder contains an instruction about how to use the script to set up CI/CD pipelines for a containerized .NET Core sample microservice that is deployed to Azure.

Thanks for process such an informative post. Looking forward to see more of such informative posts from you